
When Your Car Goes Silent: What a Blown Fuse Means for You
Knowing how to change a fuse in a car for beginners can save you a trip to the shop and get your radio, windows, or lights working again in minutes.
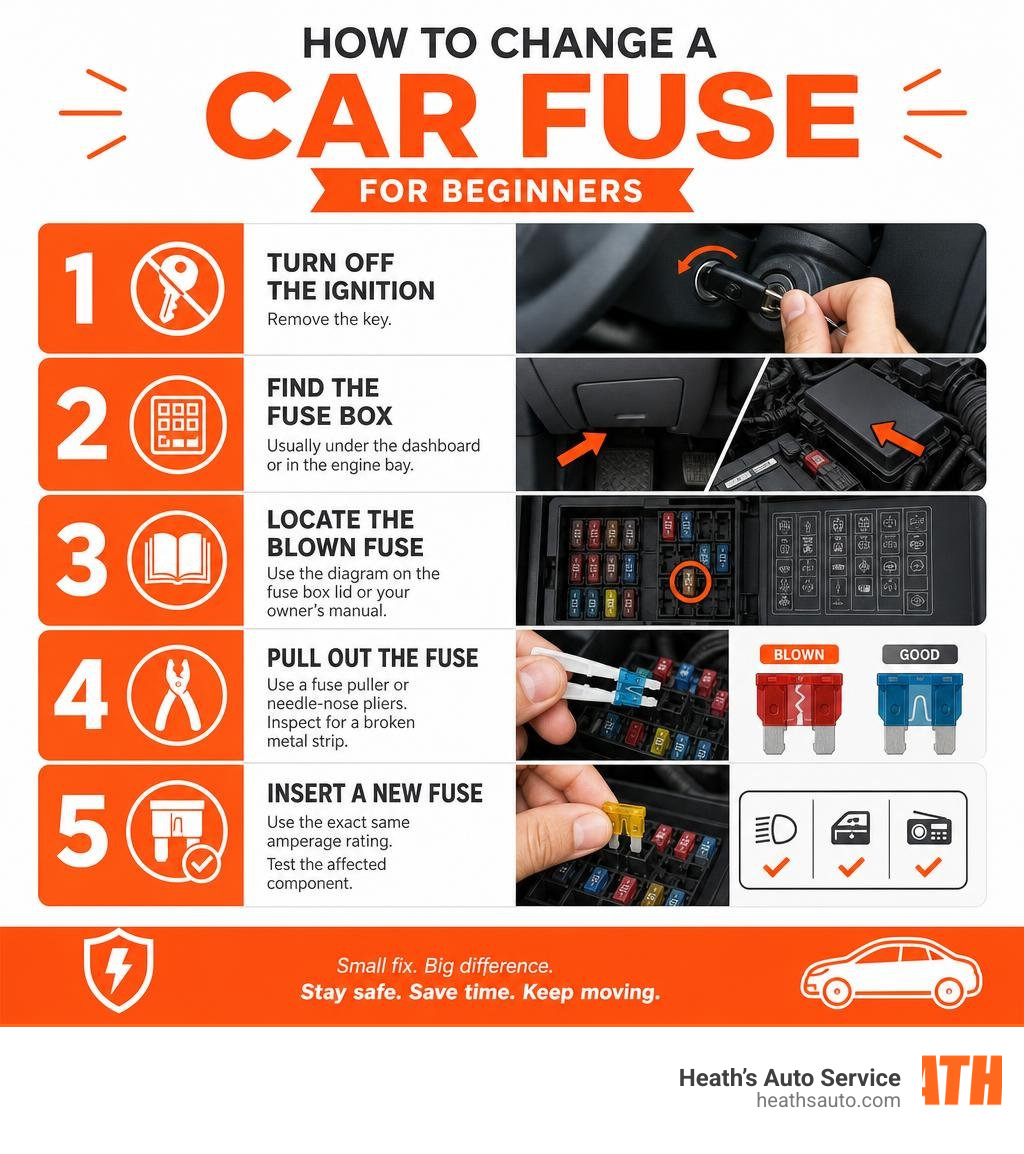
Here’s how to change a car fuse in 5 quick steps:
- Turn off the ignition and remove the key
- Find the fuse box — usually under the dashboard or in the engine bay
- Locate the blown fuse using the diagram on the fuse box lid or your owner’s manual
- Pull out the fuse with a fuse puller or needle-nose pliers and inspect it for a broken metal strip
- Insert a new fuse with the exact same amperage rating, then test the affected component
One minute your radio is on. The next, silence. Or your power windows stop mid-roll. Or your headlights cut out with no warning.
It feels like something expensive just broke. Most of the time, it hasn’t.
A blown fuse is one of the most common causes of sudden electrical failures in cars — and it’s one of the easiest fixes you can do yourself. No special training needed. Fuses typically cost just a few dollars, and the whole job usually takes under 10 minutes.
Modern vehicles are packed with electrical systems: power windows, infotainment screens, sensors, lighting, and more. Every one of those systems is protected by a small fuse. When something goes wrong — a power surge, a short circuit, an overloaded circuit — the fuse blows on purpose to protect the rest of your car’s wiring from damage or fire.
Think of it as a small sacrifice that saves a much bigger problem.
At Heath’s Auto Service, after years of helping Arizona drivers diagnose electrical issues — including plenty of blown fuses — we know that understanding how to change a fuse in a car for beginners is one of the most practical skills any driver can have. Let’s walk you through everything you need to know.
What is a Car Fuse and Why Does It Blow?

At its core, a car fuse is a safety valve for your vehicle’s electrical system. Every electrical accessory in your car—from the powerful headlights to the tiny USB port charging your phone—draws electrical current from the battery and alternator.
This electrical current travels through wires. If a component malfunctions, or if you plug in a faulty accessory, it can draw way too much electricity. When too much current flows through a wire, the wire heats up. Without protection, this heat can melt the wire’s insulation, destroy expensive electronic control units (ECUs), or even spark an electrical fire.
This is where the fuse steps in as a “noble sacrifice.” Inside every fuse is a thin metal filament designed to carry a very specific amount of electrical current (measured in amperes, or amps). If the current exceeds this limit, the metal filament overheats and melts, instantly breaking the circuit. This stops the flow of electricity before any damage can reach your car’s expensive wiring harnesses or computers.
Fuses typically blow for one of three reasons:
- Overloaded Circuits: Plugging too many high-draw accessories into your 12V power outlets (like a heavy-duty tire inflator or a cheap multi-port USB charger).
- Short Circuits: A hot wire accidentally touching the metal frame of the car or another wire, creating a path of zero resistance that causes current to spike.
- Failing Components: A motor (such as your windshield wiper motor or power window motor) wearing out and seizing up, which forces it to draw massive amounts of electricity to try to spin.
Why Learning How to Change a Fuse in a Car for Beginners Matters
If you aren’t familiar with basic car maintenance, a sudden electrical failure can make you feel like your car is falling apart. It is incredibly tempting to immediately call a tow truck or schedule an expensive diagnostic appointment.
However, taking a few minutes to learn how to change a fuse in a car for beginners offers massive benefits:
- Incredible Cost Savings: A pack of replacement fuses costs less than a cup of coffee. If you take your car to a shop just to swap a blown fuse, you might pay for diagnostic labor. Learning this simple DIY skill keeps that hard-earned money in your wallet.
- Time Efficiency: Instead of waiting hours at a repair shop or scheduling your day around an appointment, you can diagnose and resolve a blown fuse in your own driveway in under ten minutes.
- Roadside Safety: Imagine driving through Flagstaff or Cottonwood during a sudden summer storm, and your windshield wipers suddenly die. Knowing how to quickly swap a fuse can get you safely back on the road without being stranded in dangerous weather.
- Confidence and Empowerment: Demystifying your vehicle’s fuse box is the perfect gateway to basic DIY car maintenance.
If you want to read more about how to tell when a fuse has given up the ghost, check out our guide: Did Your Car Blow a Fuse? Here’s How to Replace It!.
Understanding Different Types of Car Fuses
Not all fuses are created equal. If you look inside a modern vehicle’s fuse panel, you will see an assortment of colorful plastic plugs with metal prongs. These are called blade fuses, and they are the industry standard for modern passenger vehicles.
Here are the most common fuse types you might encounter:
- Micro2 and Micro3 Fuses: The smallest blade-style fuses, commonly used in newer, highly compact electrical systems.
- Mini Fuses: Slightly larger than micro fuses, these are incredibly common in vehicles built over the last two decades.
- Standard (ATO/ATC) Fuses: These are the traditional blade fuses that most people picture. They have been used widely since the late 1970s.
- Maxi Fuses: Much larger than standard fuses, these are heavy-duty fuses used for high-amperage circuits like car stereos, cooling fans, or alternator connections.
- Glass Tube Fuses: If you are working on a classic car (typically built before the mid-1980s), you will find cylindrical glass tubes with metal end caps.
- Cartridge / High-Current Fuses: These are block-shaped fuses used to protect major electrical feeds, often bolted directly into the engine bay fuse box.
To make identification easier, modern blade fuses are color-coded by their amperage rating. For example, a red fuse is almost always 10 amps, while a blue one is 15 amps. The amp rating is also printed clearly on top of the plastic casing.
To learn more about identifying specific fuse shapes and sizes for your vehicle, you can reference the Guide to Car Fuse Types.
Locating Your Car’s Fuse Boxes and Diagrams

Before you can replace a fuse, you have to find it. Most modern vehicles have at least two fuse boxes—and some luxury or highly complex vehicles have three or more.
Here is where they are typically hidden:
- Under the Hood (Engine Compartment): This fuse box is usually a black plastic box located near the car battery or fender. It houses high-amperage fuses and relays for major systems like the radiator fan, anti-lock brake system (ABS) pump, starter motor, and headlights.
- Under the Dashboard (Cabin): This panel is located inside the passenger cabin, usually on the driver’s side. Look under the steering column, near your left knee, or behind a removable plastic panel in the kick panel wall. This box protects lower-amperage cabin electronics like power windows, radio, interior lights, heated seats, and airbags.
- In the Trunk or Rear Seat Area: In some vehicles, a third fuse panel is located behind a trunk trim panel or underneath the rear seat cushions.
To find the exact location of your vehicle’s panels, grab your owner’s manual and look up “fuses” in the index.
Reading the Fuse Box Diagram
Once you locate the correct fuse box, you will need to identify which specific fuse controls the broken component. Do not start pulling fuses at random! Doing so can disrupt power to critical computers, reset your radio settings, or cause dashboard warning lights to illuminate.
Instead, look at the inside of the fuse box cover. Manufacturers print a detailed fuse map or diagram directly on the lid. If it is not on the lid, you will find a highly detailed diagram in your owner’s manual.
The diagram uses labels, numbers, and abbreviations to identify each fuse’s job. For example:
- RADIO / AUD: Controls the car stereo.
- CIG / 12V / AUX: Controls the cigarette lighter or 12V accessory outlets.
- WIPER: Controls the windshield wipers.
- HTD SEAT: Controls the heated seats.
- H-LPR / HD LAMP: Controls the headlights.
Each position on the map corresponds to a physical slot in the fuse box and lists the correct amperage rating (e.g., “15A” or “10A”). Always use this diagram to guide your eyes to the exact fuse you need to inspect.
Preparing for the Replacement: Tools and Safety
While changing a fuse is a very safe DIY task, you are still working with your vehicle’s electrical system. Taking a few simple safety precautions prevents accidental short circuits, blown computer modules, or mild electrical shocks.
- Turn Off the Ignition: Never work on a fuse box while the engine is running or the key is turned to the “ON” or “ACC” position. Always turn the car completely off and pull the key out of the ignition.
- Let the Engine Cool: If you are replacing a fuse in the engine bay, let the car sit for 15 to 20 minutes to avoid burning yourself on hot engine components.
- Disconnect the Battery (Optional but Recommended): For extra safety, especially if you are working on high-amperage fuses in the engine bay, disconnect the negative (black) battery terminal. This completely cuts power to the vehicle and eliminates any risk of sparking.
- Avoid Metal Tools on Live Panels: Never use regular metal screwdrivers or uninsulated pliers to pry a fuse out while the battery is connected, as touching two metal terminals at once can cause a massive short circuit.
If you are hesitating or feel unsure about diving into your car’s wiring, take a look at our quick guide: I Need to Replace a Burned Out Fuse. What Should I Do?.
Essential Tools for How to Change a Fuse in a Car for Beginners
One of the best parts of this job is that it requires very little equipment. In fact, you might already have everything you need inside your car!
Here are the essential tools to gather:
- Your Owner’s Manual: Your ultimate map for locating panels and identifying circuits.
- A Fuse Puller: This is a small plastic tweezer-like tool designed specifically to grip blade fuses. Manufacturers often clip a free fuse puller inside the cover of the engine bay fuse box, alongside a few spare fuses.
- Needle-Nose Pliers: If your car doesn’t have a plastic fuse puller, a pair of needle-nose pliers works perfectly. Just pull straight out gently to avoid cracking the plastic housing of the fuse.
- A Flashlight: Cabin fuse boxes are often tucked away in dark, cramped footwells. A bright flashlight or your smartphone’s camera light is essential.
- Replacement Fuses: You must use a replacement fuse of the exact same style and amperage rating. Keeping a small, cheap assortment kit of common fuses (10A, 15A, 20A, 30A) in your glove box is fantastic insurance.
- A Multimeter (Optional): Helpful if you want to test a fuse without pulling it out.
For a deeper dive into the tools and simple preparation tips, you can read the step-by-step breakdown on DIY Fuse Replacement At Home for Beginners.
How to Change a Fuse in a Car for Beginners: Step-by-Step
Now that you have gathered your tools, located your fuse box, and taken safety precautions, it is time to perform the replacement. Follow these simple steps:
Step 1: Locate the Target Fuse
Using your owner’s manual and the diagram on the fuse box cover, locate the physical fuse that corresponds to your malfunctioning component (for example, the 15-amp radio fuse).
Step 2: Pull the Fuse Straight Out
Take your plastic fuse puller or needle-nose pliers, clamp onto the top of the target fuse, and pull straight out. Do not twist, wiggle, or rock the fuse excessively, as this can bend or damage the metal terminals inside the fuse box.
Step 3: Inspect the Fuse
Hold the pulled fuse up to a bright light source (or your flashlight) and look through its clear plastic window.
- If the fuse is good: The U-shaped metal wire inside will be completely intact and continuous.
- If the fuse is blown: The metal wire will be visibly broken, melted, or severed in the middle. You may also notice dark burn marks or cloudiness inside the plastic casing.
Tip: If the wire looks intact but you still suspect the fuse is dead, you can use a multimeter set to “Continuity” mode. Touch the meter’s metal probes to the tiny exposed metal test points on top of the fuse. If the multimeter beeps, the fuse is good. If it remains silent, the circuit is broken.
Step 4: Choose the Correct Replacement
If the fuse is blown, you must select a replacement that matches the original fuse in size, style, and amperage rating. Never guess! Refer to the table below to match common blade fuse colors with their correct amperage ratings.
| Fuse Color | Amperage Rating (Amps) | Common Protected Systems |
|---|---|---|
| Tan | 5A | Low-power sensors, mirrors, radio memory |
| Brown | 7.5A | Interior lights, dashboard display, turn signals |
| Red | 10A | Airbags, engine computers, audio system |
| Blue | 15A | Power outlets, cigarette lighter, fuel pump |
| Yellow | 20A | Windshield wipers, sunroof, power seats |
| Clear | 25A | Blower motor, subwoofers |
| Green | 30A | Power windows, starter, radiator cooling fan |
Step 5: Insert the New Fuse
Gently push the new fuse straight into the empty slot by hand until it sits flush with the surrounding fuses. Do not force it; if it is aligned correctly, it should slide in smoothly.
Step 6: Test the System
Turn your car’s key to the “ON” position and test the component that was broken. If your radio powers up, your windows roll down, or your headlights shine, congratulations! You have successfully completed your first electrical repair.
Troubleshooting: What If the New Fuse Blows Immediately?
In a perfect world, swapping the fuse solves the issue permanently. However, sometimes you insert a brand-new fuse, turn on the ignition, and pop—the new fuse blows immediately or shortly after.
If this happens, do not keep feeding new fuses into the slot.
A fuse that blows repeatedly is a clear warning sign of an underlying electrical problem. Fuses do not blow for no reason; they blow because too much current is passing through the circuit. Replacing the fuse repeatedly without fixing the root cause can melt your wiring harness or cause an electrical fire.
Common causes for repeated blown fuses include:
- A Defective Accessory: If your accessory outlet (cigarette lighter) fuse blows every time you plug in a specific phone charger or dashcam, the charger itself has an internal short. Unplug it and try a different accessory.
- A Dead Short to Ground: A wire’s protective plastic insulation may have rubbed against a sharp metal edge of the car’s frame, exposing the bare copper wire and creating a short circuit.
- A Seized Motor or Failed Component: If your windshield wiper fuse blows the moment you turn on the wipers, the wiper motor itself may be burned out and seized, drawing massive current as it struggles to move.
- Water Intrusion: Rainwater leaking into a headlight housing, taillight, or cabin area can bridge electrical terminals and cause a short.
If you are dealing with a stubborn electrical system that keeps eating fuses, you can learn more about diagnosing deep-seated electrical problems by reading Why Your Car’s Electricity Dies Suddenly — A Professional Guide to Checking and Replacing Fuses Step by Step.
Frequently Asked Questions About Car Fuses
Can I use a higher amperage fuse if I don’t have the correct one?
Absolutely not. This is one of the most dangerous mistakes a beginner can make. If a circuit is designed for a 10-amp fuse and you install a 20-amp or 30-amp fuse, you are allowing twice or three times as much current to flow through the wires as they were built to handle. The wires will overheat, melt their insulation, and can easily start a fire long before the oversized fuse ever blows. Always match the exact amperage rating specified on the diagram.
How can I tell if a fuse is blown without pulling it?
You can test fuses in place using a simple, inexpensive tool called a circuit test light or a multimeter. Turn your car’s ignition to the “ON” position. Touch the ground clamp of your test light to a bare metal part of the car’s frame. Then, touch the metal tip of the test light to the two tiny metal test ports exposed on top of the fuse. If the light shines on one side of the fuse but not the other, the fuse is blown. If you are using a multimeter, switch it to “Continuity” or “Ohms” and touch the probes to the test ports; a good fuse will show continuity (or beep), while a blown fuse will show an open circuit (OL).
Is it safe to drive with a blown fuse?
It depends entirely on which circuit has failed. If the blown fuse controls your car radio, power windows, or air conditioning, it is perfectly safe to drive until you can get a replacement. However, if the blown fuse controls critical safety systems—such as your headlights, taillights, turn signals, windshield wipers, or fuel pump—you should not drive the vehicle until the fuse is replaced, as doing so poses a major safety hazard.
Conclusion
Learning how to change a fuse in a car for beginners is a highly rewarding, budget-friendly skill that demystifies your car’s electrical system. In most cases, a simple visual inspection and a quick swap are all it takes to get your favorite accessories working again.
However, if you find yourself dealing with a fuse that blows repeatedly, or if you feel uncomfortable poking around your vehicle’s fuse panels, it is always best to let professionals handle the heavy lifting. Electrical diagnostics can quickly become complex, and guessing can lead to expensive damage.
We stand behind our work with our industry-leading 3-year/36,000-mile nationwide warranty, offer same-day service to get you back on the road fast, and are always happy to provide free second opinions.
Heath’s Auto Service In Scottsdale, AZ
At Heath’s Auto Service, we offer a comprehensive range of services and repairs to meet all your automotive needs. Our highly skilled technicians are equipped with the latest tools and technology to ensure your vehicle is serviced to the highest standards. Contact our team today!