
Why Common Rail Injector Repair Is More Complex Than You Think
Common rail injector repair is one of the most demanding jobs in modern diesel service — and one of the most misunderstood.
Here’s a quick answer if you’re short on time:
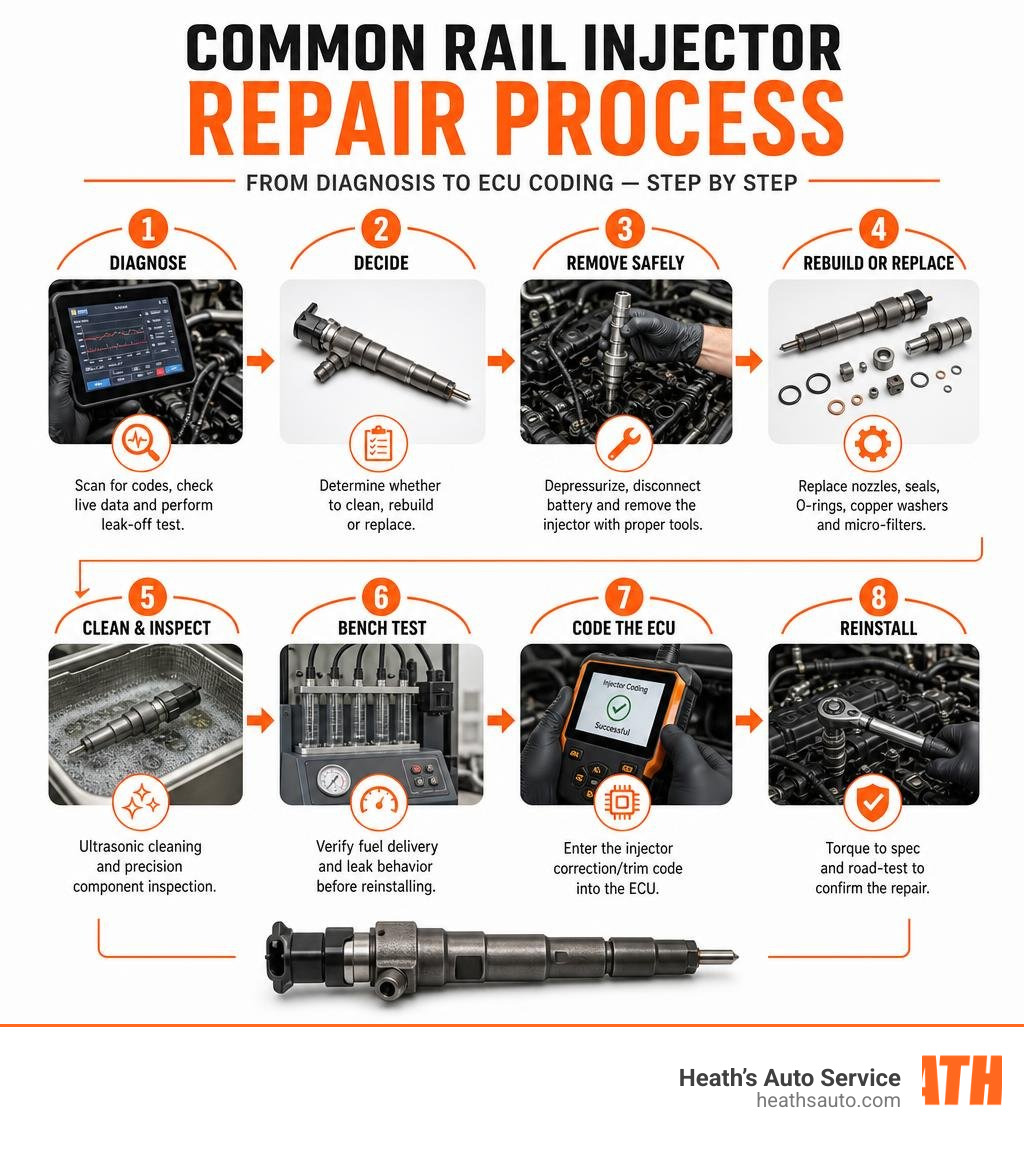
How to repair a common rail injector (overview):
- Diagnose — Scan for fault codes, check live cylinder balance data, and perform a back-leakage (leak-off) test
- Decide — Determine whether the injector needs cleaning, rebuilding, or full replacement
- Remove safely — Depressurize the system, disconnect the battery, and extract the injector using proper tools
- Rebuild or replace — Replace nozzles, seals, O-rings, copper washers, and micro-filters to OEM spec
- Clean and inspect — Ultrasonic cleaning and precision component inspection before reassembly
- Bench test — Verify fuel delivery and leak behavior before reinstalling
- Code the ECU — Enter the injector’s correction/trim code into the ECU so fuel delivery is properly calibrated
- Reinstall — Torque all components to spec and road-test to confirm the repair
These systems inject fuel at pressures up to 30,000 psi through clearances as small as 1 micron — roughly 80 times smaller than a human hair. At that level of precision, even a tiny particle of contamination or one skipped step can turn a fixable injector into scrap.
That’s exactly why so many diesel owners end up with repeat failures, unexpected costs, or a rough-running engine after the repair. The job demands the right tools, clean technique, and ECU calibration — not just a parts swap.
At Heath’s Auto Service across Arizona, our certified technicians handle common rail injector repair daily — from basic diagnostics to full bench rebuilds. In the sections below, we’ll walk you through everything you need to know to get it done right the first time.
Glossary for common rail injector repair:
Understanding Common Rail Technology vs. Legacy Systems
Before we roll up our sleeves and grab the wrench, we have to understand what makes common rail diesel systems so different from the older setups you might have worked on in the past.
In older mechanical fuel systems or unit injector (HEUI) setups, injection pressure was generated mechanically inside each individual injector, often driven by the camshaft. These systems operated at much lower pressures (usually under 5,000 to 10,000 psi) and had larger tolerances. They were loud, relatively inefficient, and only capable of one single, heavy injection of fuel per combustion cycle.
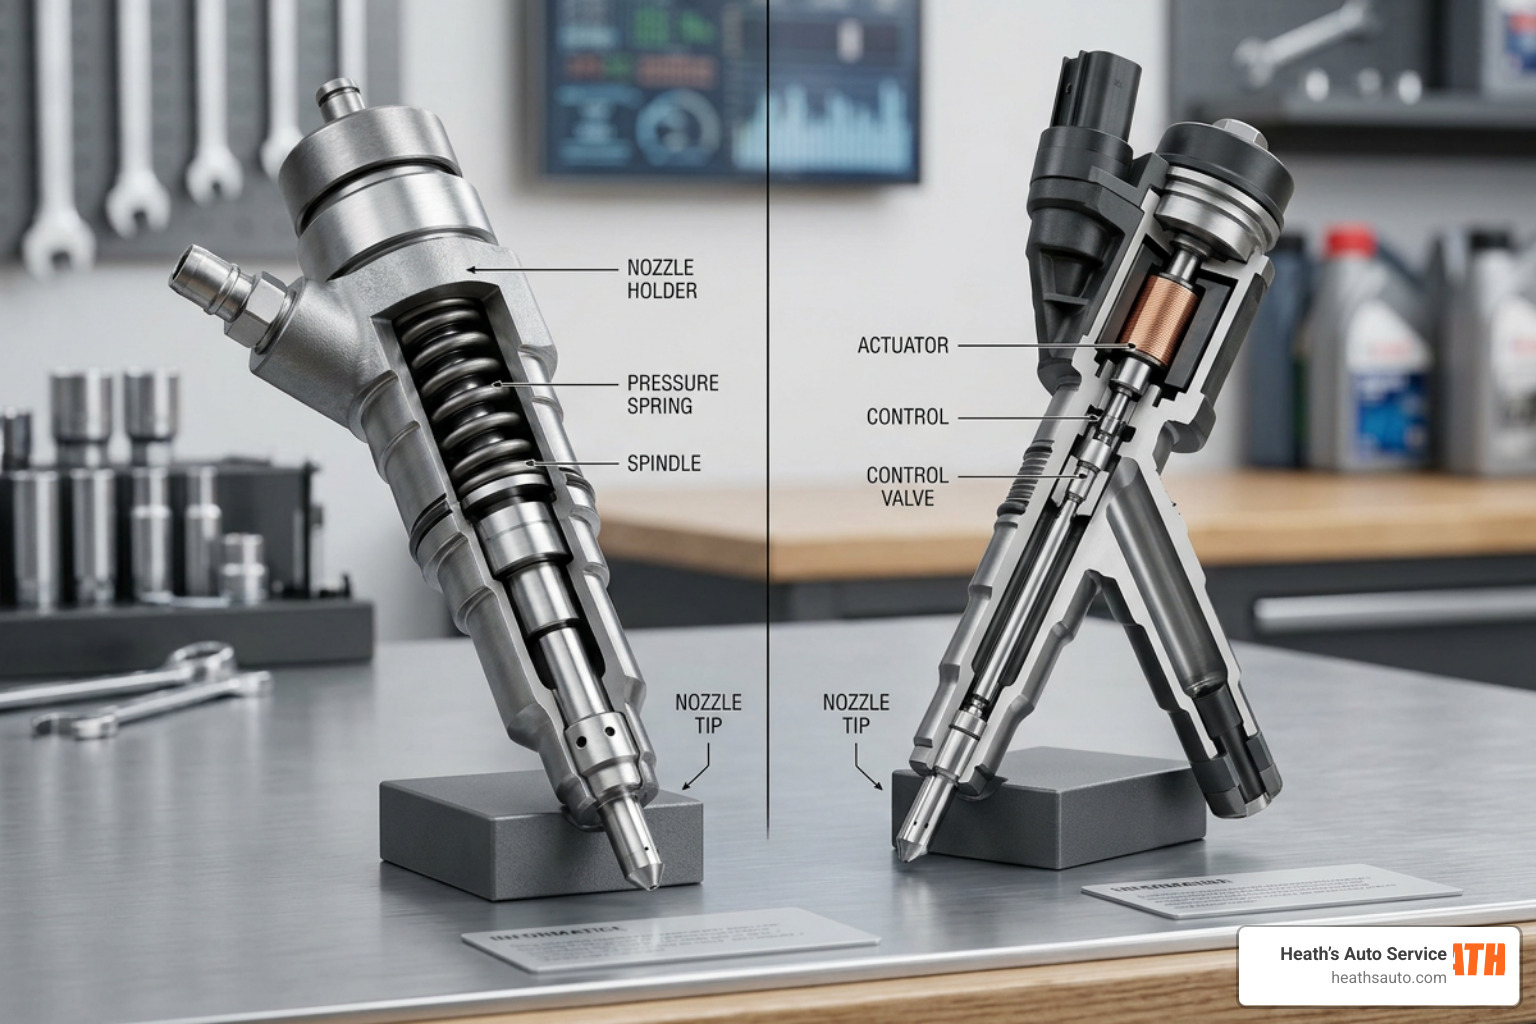
Common rail technology changed everything. In a common rail system, a high-pressure fuel pump supplies a single shared fuel rail at massive pressures — up to 30,000 psi or more. The injectors themselves act as precision electronically controlled valves. Instead of waiting for a mechanical pulse, the engine control unit (ECU) triggers the injector’s internal actuator (either a solenoid or a piezo crystal stack) to open and close.
Because the pressure is already waiting in the rail, a modern common rail injector can perform up to five or more distinct injection events per combustion cycle:
- Pilot/Pre-injections: Tiny amounts of fuel injected just before the main event to smooth out combustion, quiet down the classic “diesel clatter,” and reduce emissions.
- Main injection: The primary fuel delivery that generates your engine’s torque and horsepower.
- Post-injections: Small bursts of fuel injected late in the cycle to help manage exhaust temperatures and regenerate the Diesel Particulate Filter (DPF).
With internal clearances as small as 1 micron, there is zero room for error. A single speck of dust can jam the control valve or clog the 240-micrometer spray holes in the nozzle.
| Feature | Legacy Mechanical Injectors | Unit Injectors (HEUI/PD) | Common Rail Injectors |
|---|---|---|---|
| Operating Pressure | 3,000 to 10,000 psi | 15,000 to 22,000 psi | Up to 30,000+ psi |
| Actuation Type | Mechanical / Hydraulic | Camshaft / Hydraulic Oil | Electronic (Solenoid or Piezo) |
| Injections Per Cycle | 1 (Single event) | 1 to 2 (Limited) | 5+ (Multiple micro-injections) |
| Internal Clearances | 5 to 10 microns | 3 to 5 microns | 1 micron or less |
| ECU Calibration Required | No | No | Yes (IMA / Correction Coding) |
Solenoid vs. Piezo Common Rail Injector Repair
When diagnosing or planning a common rail injector repair, you must know whether you are dealing with a solenoid-actuated or a piezoelectric-actuated injector.
Solenoid Injectors: These use a traditional electromagnetic coil. When the ECU sends current to the coil, it creates a magnetic field that lifts a small armature and opens the control valve. Solenoid injectors are highly reliable, widely used, and generally easier to rebuild. However, if they suffer from severe internal electrical shorting, the solenoid coil itself cannot always be repaired and must be replaced.
Piezo Injectors: Instead of an electromagnet, piezo injectors contain a stack of hundreds of microscopic ceramic crystals. When voltage is applied, these crystals expand instantly. This reaction speed is significantly faster than a solenoid, allowing for even more precise fuel metering. However, piezo injectors operate at much higher voltages (often over 100V) and are incredibly sensitive.
According to Best practice advice for servicing Common Rail injectors, piezo injectors have strict repairability limits. Because of the delicate nature of the crystal stack, many piezo units cannot be fully rebuilt on a standard workbench and must instead be replaced with new or factory-remanufactured units when they fail.
Why Common Rail Injectors Fail
Because these components operate under such extreme conditions, they are highly vulnerable to premature wear. Knowing what causes failure is the first step in preventing it.
- Fuel Contamination: This is the undisputed champion of injector failure. Particulate matter, dust, or metal shavings from a failing high-pressure pump will act like liquid sandpaper inside the injector, destroying the control valve seat.
- Water Corrosion: Water in diesel fuel is catastrophic. It reacts with chemicals in the fuel to corrode metal surfaces, ruins the lubricating properties of the diesel, and can cause the injector tip to crack or blow off entirely due to rapid steam expansion.
- Carbon Coking: High residual engine heat after shutdown can cause fuel remaining on the injector tip to bake, forming hard carbon deposits (coking). This distorts the spray pattern, preventing proper atomization.
- Abrasive Wear: Over time, even clean fuel flowing at 30,000 psi will naturally erode the microscopic nozzle holes and internal sealing surfaces.
- Installation Errors: Reusing old copper crush washers, over-torquing hold-down clamps, or failing to clean the injector well can cause combustion gases to leak past the injector, leading to severe carbon buildup (often called “black death”).
Keeping your fuel system clean is more important than ever in 2026. For practical advice on safeguarding your fuel system against rising fuel costs and poor fuel quality, check out our guide on High Diesel Prices in 2026 How to Keep Your Diesel on the Road.
Spotting the Symptoms of a Failing Injector
If one or more injectors are starting to fail, your engine won’t keep it a secret. Watch out for these common warning signs:
- Rough Idle and Misfires: If an injector is clogged or has a lazy actuator, fuel won’t atomize correctly, causing the cylinder to misfire.
- Engine Knock: Excessive fuel leaking into the cylinder due to a stuck-open nozzle can cause pre-ignition knock, which can quickly ruin a piston.
- Black or White Smoke: Black smoke indicates unburnt fuel (too much fuel or poor atomization), while white smoke often points to raw, unvaporized fuel passing straight through the exhaust (often from a stuck-open injector).
- Hard Starting: If the internal control valves are worn, too much high-pressure fuel will bypass the injector and return to the tank. This makes it difficult for the high-pressure pump to reach the minimum pressure required to start the engine.
- Loss of Fuel Economy: A distorted spray pattern or leaking valve wastes fuel and drops your MPG significantly.
- Diagnostic Trouble Codes (DTCs): Look for codes like P0201 through P0208 (injector circuit faults) or P0300 series (cylinder misfires).
Step-by-Step Diagnostics for Common Rail Injector Repair
Before you start tearing down the engine, you need to prove which injector is at fault. Guessing is expensive; precise testing is cheap.
Step 1: OBD Scanning and Live Data Analysis
Connect a high-quality diagnostic scanner to the OBD-II port. Start the engine and navigate to live data. You want to look at cylinder fuel balance rates (sometimes called cylinder contribution or correction values). The ECU will automatically add or subtract fuel from individual cylinders to maintain a smooth idle. If one cylinder shows a high positive correction value (e.g., +4.0 mm³/stroke), the ECU is trying to compensate for a weak or clogged injector on that cylinder.
Step 2: Rail Pressure Sensor Checks
Monitor the fuel rail pressure during cranking and running. If the engine won’t start and rail pressure stays below 2,500 psi, you likely have a massive internal leak-back issue where the injectors are dumping too much fuel back into the return line.
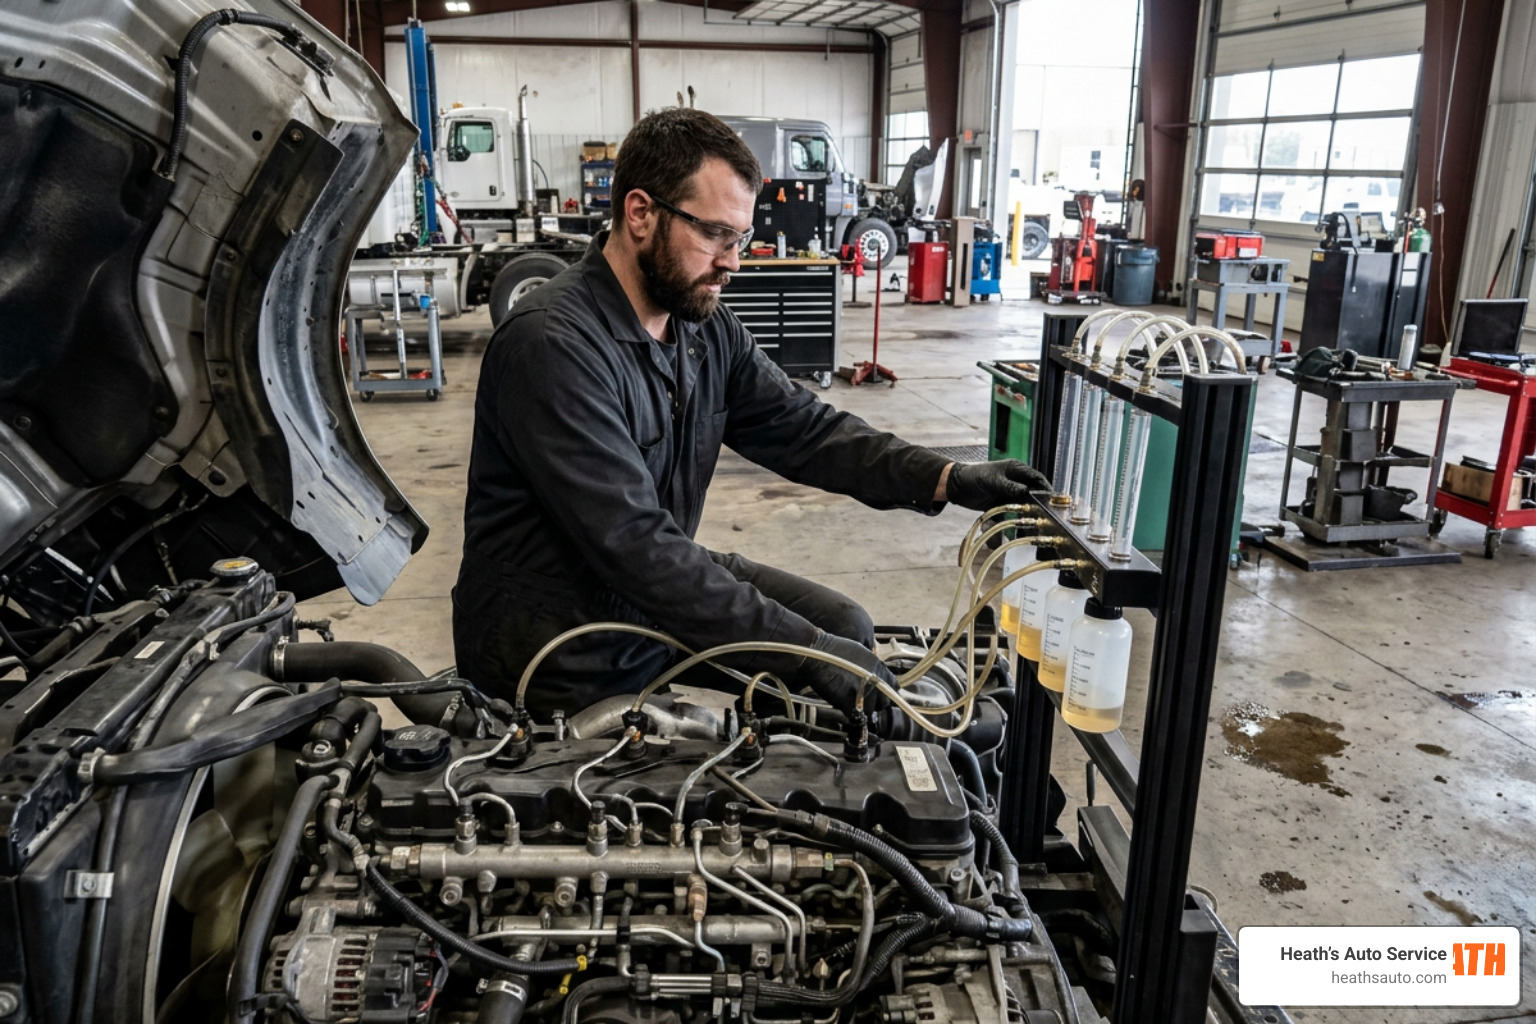
Step 3: The Back-Leakage (Leak-Off) Test
This is the gold standard of on-vehicle common rail testing.
- Disconnect the fuel return lines from each injector.
- Connect a graduated test bottle kit to the return port of each injector.
- Start the engine (or crank it if it won’t start) and let it run for a set period (usually 2 to 5 minutes).
- Measure the volume of fuel returned from each injector.
- The Verdict: A healthy injector should return very little fuel. If one injector has significantly higher return volume than the others, its internal control valve is worn out and bypassing fuel.
Step 4: Electrical Integrity Testing
Use a digital multimeter to measure the resistance of the injector’s solenoid coil or piezo stack. Compare your readings against OEM specifications. You should also check for insulation breakdown by measuring resistance between the injector terminals and the metal injector body; any continuity to ground means the actuator is shorted and must be replaced.
Safe Removal and Reinstallation Procedures
Once you’ve isolated the bad injector, it’s time to extract it. Common rail systems demand extreme caution during removal.
High-Pressure Safety Protocols
- Never loosen fuel lines while the engine is running or immediately after shutdown. High-pressure common rail fuel can easily pierce human skin, causing fuel injection injury, which is a life-threatening medical emergency.
- Wait at least 10 to 15 minutes after shutting off the engine for the residual rail pressure to bleed down naturally. Verify pressure is safe using your scan tool.
- Disconnect the negative battery cables to prevent any accidental electrical actuation of the injectors while you are working.
- Cleanliness is non-negotiable. Wash down the engine bay around the injectors before opening any lines. Blow away loose dirt with compressed air. Cap every open fuel line, rail port, and injector inlet immediately with clean plastic caps.
Step-by-Step Extraction and Installation
For a specific real-world example of this procedure on a common passenger car engine, you can reference the Procedure: Replacing a 1.6 TDI Commonrail injector (Siemens PCR 2.1 ) — Max En Caisse.
Here is the general workflow for safely removing and installing an injector:
- Disconnect the Electrical Connector: Carefully pull back the locking tabs. Be gentle; high engine bay heat makes plastic connectors incredibly brittle.
- Remove High-Pressure Lines: Use a flare nut wrench to loosen the line at the injector and the fuel rail. Always use a backup wrench to avoid twisting the fuel rail fittings. Cap the open ports immediately.
- Extract the Hold-Down Bolt and Clamp: Remove the retaining bolt. Always discard this bolt; most hold-down bolts are “torque-to-yield” (stretch) fasteners designed for single-use only.
- Extract the Injector: If the injector is stuck due to carbon buildup, do not pry on the plastic connector or use a heavy slide hammer on the injector head, as this can crack the body. Use a specialized injector puller tool that grips the injector securely.
- Retrieve the Copper Washer: Ensure the old copper sealing washer comes out with the injector. If it stays at the bottom of the injector well, use a brass pick to extract it without scratching the seat.
- Clean the Injector Well: Use a specialized soft plastic seat cleaning brush to clean any carbon out of the injector bore. Never use a wire brush on the sealing seat, as scratches will cause combustion gas blow-by.
- Install New Seals: Always use a brand-new copper crush washer and oil O-ring. Apply a thin smear of high-temperature copper grease to the injector body (keeping it clear of the nozzle tip) to prevent future seizing.
- Torque to Spec: Slip the injector into the well, align it correctly, and install the new hold-down bolt. Tighten it strictly to the manufacturer’s torque specification (often a low torque value followed by an angular turn, such as 8 Nm plus 180 degrees). Under-torquing causes combustion leaks; over-torquing distorts the injector body, causing internal binding.
Rebuilding and Calibrating Injectors on the Bench
If you are going to rebuild the injector yourself rather than replacing it with a pre-assembled unit, you need a clean, dedicated workspace that resembles a laboratory more than a traditional grease-monkey garage.
Precision Bench Procedures for Common Rail Injector Repair
To successfully overhaul a common rail injector, you must follow the rigorous standards detailed in Rebuilding a Fuel Injector: A Technician’s OEM Guide.
- Disassembly: Secure the injector in a specialized holding fixture. Carefully disassemble the nozzle retaining nut, nozzle assembly, pressure spring, shim, and control valve.
- Ultrasonic Cleaning: Place all disassembled steel components into an ultrasonic cleaning bath filled with a specialized solvent for 15 to 20 minutes to dissolve carbon coking and lacquer deposits.
- Inspection: Inspect all parts under a microscope. Look for microscopic scoring on the control valve stem and seat. Check the nozzle needle for freedom of movement and inspect the nozzle tip for wear. If there is any visible wear on the valve seat or nozzle, discard them.
- Component Replacement: Always replace the nozzle assembly, micro-filter, O-rings, and critical internal calibration shims with high-quality OEM replacement parts.
- Reassembly: Lubricate the parts with clean calibration fluid. Reassemble the injector using a calibrated torque wrench to tighten the nozzle retaining nut to the exact manufacturer specification.
Post-Repair Calibration and ECU Coding
You cannot simply bolt a rebuilt common rail injector back into the engine and call it a day.
Because of microscopic manufacturing variations, every injector delivers a slightly different amount of fuel at a given pressure. To compensate for this, manufacturers test each injector on a specialized bench after assembly and generate a unique alphanumeric Correction Code (often called an IMA or trim code) which is etched onto the injector body.
When you perform a common rail injector repair or replacement, you must use a diagnostic scan tool to write these new correction codes into the engine’s ECU. This tells the computer exactly how fast that specific injector reacts so it can adjust its electrical pulse timing.
Failing to code the injectors will result in a rough idle, excessive smoke, engine knock, and poor cylinder balance, as the ECU will still be using the calibration data of the old, worn-out injector.
Rebuild vs. Replace: Making the Right Decision
When faced with a bad injector, you have three choices: clean it, rebuild it, or replace it. Making the right choice depends on your budget, downtime tolerance, and the physical condition of the injector.
- When to Clean: If the injector has low mileage and the only issue is minor carbon coking on the nozzle tip (with no internal wear or high return flow), a professional ultrasonic cleaning and on-vehicle solvent flush may restore proper operation.
- When to Rebuild: Rebuilding is a highly cost-effective path if the injector body and solenoid are in perfect condition, and high-quality internal replacement parts (nozzles, control valves, shims) are readily available.
- When to Replace: You must replace the injector if it has suffered electrical coil failure, internal piezo stack degradation, a cracked outer body, or severe internal rust from water contamination.
If you are dealing with a vehicle where downtime is incredibly costly, or if you want absolute peace of mind, buying a new or factory-remanufactured injector is always the safest bet. To learn more about how professional diesel service centers evaluate these choices, check out our insights on The Nuts and Bolts of Professional Auto Diesel Repair.
Frequently Asked Questions about Common Rail Systems
What is the most common cause of common rail injector failure?
The absolute number one cause of failure is fuel contamination. Because of the incredibly tight 1-micron clearances inside modern injectors, micro-particles of dirt, rust, or water in the fuel will rapidly erode the control valve seats and clog the nozzle spray holes. Regular fuel filter replacements are your best defense.
Do common rail injectors always need coding after repair?
Yes, in almost all modern diesel engines. The ECU relies on the injector’s specific correction/trim code to calibrate its multiple micro-injection events. If you skip the coding step, the engine will likely run rough, smoke, and suffer from poor fuel efficiency.
Can I clean common rail injectors without removing them?
You can run specialized fuel additives or perform a professional pressurized solvent flush through the fuel rail to clear light carbon deposits from the nozzle tips. However, if the injector has internal physical wear, such as a worn control valve or eroded nozzle seat, no chemical cleaner in the world will fix it; it must be physically rebuilt or replaced.
Conclusion
Tackling a common rail injector repair can feel overwhelming, but by following proper cleanliness protocols, using the right diagnostic tools, and taking your time during extraction and installation, you can restore your diesel engine’s power, smooth idle, and fuel efficiency.
However, because these systems require specialized bench testing equipment and precise ECU programming, it’s often a job best left to the professionals.
Heath’s Auto Service in Cottonwood, AZ
At Heath’s Auto Service, our comprehensive range of services covers everything from routine maintenance to complex repairs. Whether it’s a minor tune-up or a major overhaul, trust us to get you back on the road with confidence. Contact our team at Heath’s Auto Service today!