
Why a Vacuum Leak Emissions Test Failure Catches So Many Drivers Off Guard
A vacuum leak emissions test failure is one of the most common — and most preventable — reasons Arizona drivers leave the inspection station without a passing sticker.
Here’s the quick answer:
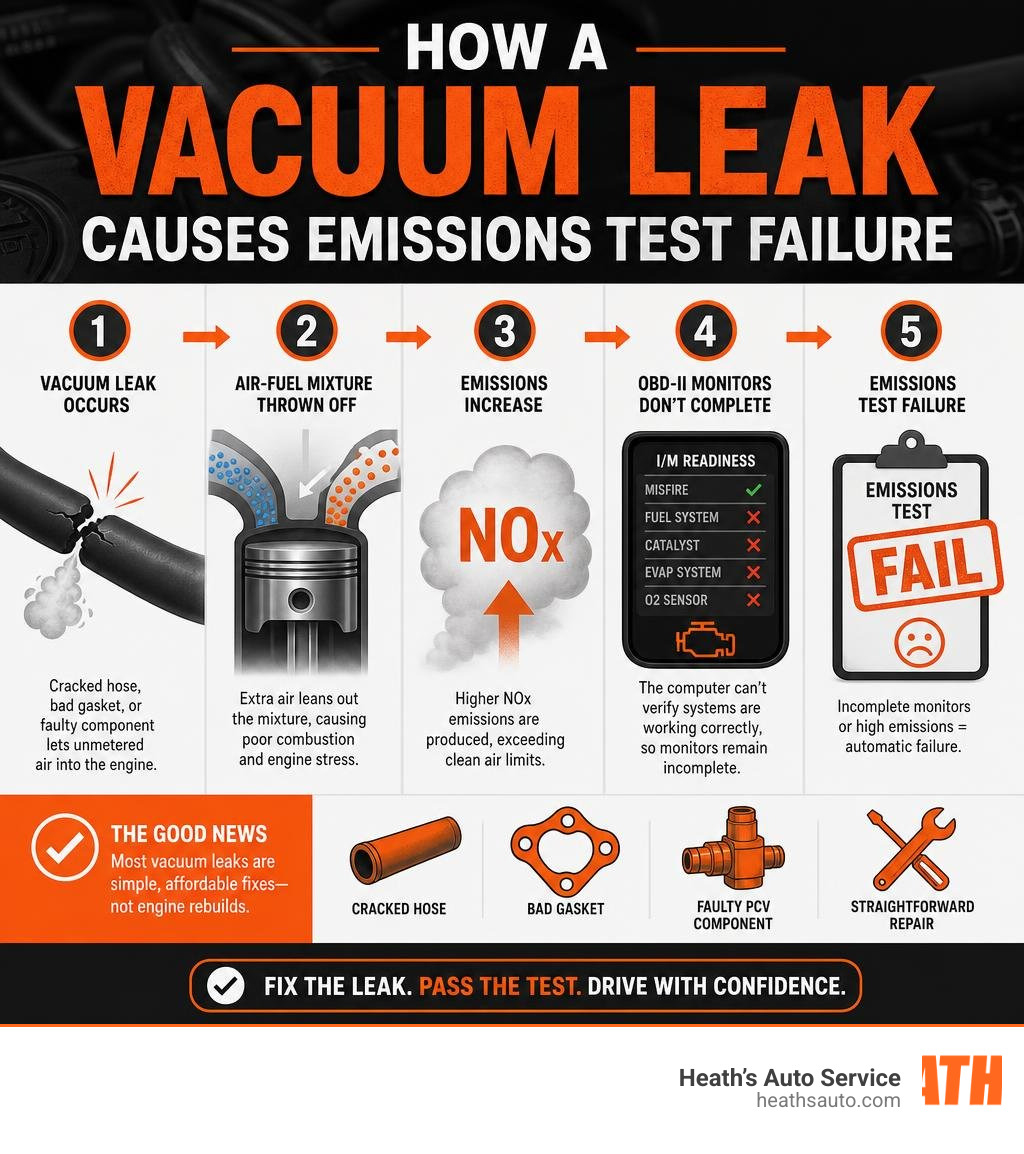
- A vacuum leak lets unmetered air into your engine, throwing off the air-fuel mixture
- This drives up harmful NOx emissions and prevents your OBD-II readiness monitors from completing
- Incomplete monitors or elevated emissions = automatic emissions test failure
- The fix is usually a cracked hose, bad gasket, or faulty PCV component — not an engine rebuild
- Repair costs typically range from $150 to $1,000, with most common fixes in the low hundreds
That check engine light and rough idle you’ve been ignoring? They’re not just annoyances. They’re your car telling you something is wrong before it costs you a failed inspection and a second trip back.
Most drivers don’t connect those symptoms to an emissions problem until they’re already sitting in the waiting room at a test station. The good news: if you catch it early, a vacuum leak is usually a straightforward repair.
At Heath’s Auto Service, after years diagnosing and repairing vehicles across Arizona — including plenty of vacuum leak emissions test failures — our team has seen how a simple cracked hose can turn into a failed inspection and an expensive scramble. Let’s walk through exactly what you need to know.
Quick vacuum leak emissions test definitions:
What is a Vacuum Leak and How Does It Differ From an EVAP Leak?
To understand how a vacuum leak can sabotage your emissions test, we first need to look at how your engine breathes.
An internal combustion engine acts as a giant air pump. During the intake stroke, the pistons move downward, creating a low-pressure area inside the intake manifold. Because the atmospheric pressure outside is higher, air wants to rush in. The throttle plate regulates this airflow. The vacuum generated in this sealed system is known as manifold vacuum, and it is used to power various auxiliary systems, from your power brake booster to emissions control valves.
A vacuum leak occurs when unmetered air bypasses the throttle body and enters the engine through an unintended opening. Because this air enters downstream of the Mass Air Flow (MAF) sensor, the engine’s computer (the Powertrain Control Module, or PCM) doesn’t know it’s there. This extra air leans out the combustion process, meaning there is too much air and not enough fuel.
An EVAP (Evaporative Emission Control) leak, on the other hand, is a completely different animal. While a vacuum leak involves air entering the engine, an EVAP leak involves fuel vapors escaping the fuel storage system. The EVAP system is designed to capture raw gasoline vapors from the fuel tank, store them in a charcoal canister, and purge them into the engine to be burned safely during normal driving.
Vacuum Leak vs. EVAP Leak: Symptoms and Emissions Impact
While both issues can trigger your check engine light and cause you to fail an emissions test, they present very different symptoms under the hood:
- Vacuum Leaks: Because they introduce unmetered air directly into the combustion chamber, vacuum leaks severely impact engine performance. Common symptoms include a rough idle, engine hesitation, idle speed fluctuations (idle hunting), and even stalling. The PCM will attempt to correct the lean condition by adjusting fuel trims, which we can read using a diagnostic scanner.
- EVAP Leaks: An EVAP leak rarely affects how the engine runs. Because the fuel tank and vapor lines are separate from the high-vacuum intake manifold (except during controlled purge cycles), a leak in this system won’t cause a rough idle. Instead, you might notice a faint smell of raw gasoline near the back of the car, or you might simply see a P0442 Code — EVAP System Small Leak Detected pop up on your dashboard.
If you are trying to determine which issue is plaguing your vehicle, checking for physical symptoms is a great starting point. For a deeper dive into physical symptoms, read our guide on Signs Your Car’s Engine Has a Vacuum Leak.
Environmental and Regulatory Differences
The environmental impacts of these two leaks are distinct, which is why regulatory agencies like the EPA police them so strictly.
A vacuum leak causes a lean air-fuel mixture, which raises combustion temperatures. When combustion temperatures spike, nitrogen and oxygen in the air fuse together, creating high levels of nitrogen oxides (NOx) — a primary contributor to smog and respiratory issues.
Conversely, EVAP leaks release raw hydrocarbons directly into the atmosphere. Hydrocarbons are essentially unburned fuel vapors. To put this in perspective, a single car with a persistent EVAP leak can release several pounds of raw hydrocarbons into the air annually.
The regulations surrounding these systems are incredibly precise. In fact, under federal law 40 CFR § 1065.345 – Vacuum-side leak verification, even the laboratory equipment used to perform official emissions testing must undergo rigorous vacuum-side leak verification to ensure no outside air dilutes the test samples. If the government requires its own testing equipment to maintain a perfect vacuum seal, you can bet your vehicle’s engine is held to a similarly high standard!
How to Pass a Vacuum Leak Emissions Test
If you are facing an upcoming inspection, trying to pass an emissions test with an active vacuum leak is a losing battle. Modern emissions testing relies heavily on your vehicle’s On-Board Diagnostics (OBD-II) system.
During a standard Arizona emissions test, the technician won’t just look at what is coming out of your tailpipe; they will plug a diagnostic tool into your OBD-II port. The state’s testing computer checks two main things:
- Whether your Check Engine Light (MIL) is commanded on.
- The status of your OBD-II readiness monitors.
Readiness monitors are self-tests performed by your car’s PCM as you drive. If a vacuum leak is present, the PCM will detect a lean air-fuel mixture or a lean misfire. This prevents the oxygen sensor, catalytic converter, and fuel system monitors from completing their self-tests. If these monitors are “Not Ready,” or if a trouble code is stored, your vehicle will fail immediately.
Why a Vacuum Leak Emissions Test Failure Occurs
When unmetered air enters the intake manifold, the oxygen sensors in your exhaust detect an excess of oxygen. The PCM recognizes this lean condition and tries to compensate by increasing the fuel injector pulse width — a process known as adding positive fuel trim.
If the leak is large enough that the PCM has to add more than 15% to 20% extra fuel to keep the engine running correctly, it realizes the system is operating outside of normal parameters. At this point, it triggers the check engine light and stores specific diagnostic trouble codes (DTCs), such as:
- P0171 / P0174: System Lean (Bank 1 / Bank 2)
- P0507: Idle Air Control System RPM Higher Than Expected
For a comprehensive breakdown of how these codes are triggered, check out our Decoding the Check Engine Light: Master Auto Diagnostics Guide.
Preparing Your Vehicle for the Inspection
A common mistake we see drivers make is clearing their trouble codes with a cheap scanner right before pulling into the emissions station. While this temporarily turns off the check engine light, it also resets all your OBD-II readiness monitors to “Not Ready.”
To pass, you must resolve the physical leak, clear the codes, and then drive the vehicle through a specific “drive cycle” so the computer can run its self-tests and mark the monitors as “Ready.”
Identifying and Diagnosing Engine Vacuum Leaks
Finding a vacuum leak can sometimes feel like searching for a needle in a haystack. Because vacuum hoses are made of rubber or plastic, they easily become brittle and crack due to the extreme heat cycles under your hood.
Common sources of vacuum leaks include:
- Dry-rotted or disconnected vacuum lines
- Cracked intake manifold gaskets or throttle body gaskets
- A torn intake air duct boot (especially in the bellows)
- A failing Positive Crankcase Ventilation (PCV) valve or hose
- A leaking brake booster diaphragm or supply hose
Key Symptoms to Watch For Before Your Test
Before you pull out the tools, pay close attention to how your car behaves. A vacuum leak will almost always give itself away through one of these symptoms:
- An Audible Hissing Sound: A physical “sucking” or hissing noise coming from the engine bay, which often sounds like a miniature vacuum cleaner.
- A Rough or Unusually High Idle: Because the extra air acts like a slightly open throttle, your idle speed may climb, or it may bounce up and down wildly.
- Engine Stalling: If the leak is large enough, the air-fuel mixture becomes too lean to support combustion, causing the engine to sputter and die when you come to a stop.
If you suspect your car is drawing in unmetered air, our detailed guide, Sucking Air: Your Guide to Vacuum Leak Car Repair, can help you narrow down the symptoms.
Confirming Leaks with Fuel Trim Data
Before you start spraying fluids or tearing your engine apart, you can easily confirm a vacuum leak using a basic OBD-II scan tool that displays live data. Look specifically at your Short-Term Fuel Trim (STFT) and Long-Term Fuel Trim (LTFT).
Here is the secret to diagnosing a vacuum leak using fuel trims:
- Check Trims at Idle: If you have a vacuum leak, your fuel trims will be highly positive (e.g., STFT + LTFT combined is greater than +15%). This is because manifold vacuum is highest when the throttle plate is closed, allowing the leak to introduce a large percentage of unmetered air relative to the total air entering the engine.
- Rev the Engine to 2,500 RPM: Hold the engine speed steady. If the fuel trims drop back down close to 0%, you have a vacuum leak. Why? When the throttle opens, the volume of metered air entering the engine increases dramatically, making the small amount of air entering through the leak statistically insignificant.
If your fuel trims remain high at both idle and 2,500 RPM, your issue is more likely a weak fuel pump, a clogged fuel filter, or a dirty MAF sensor rather than a vacuum leak. You can read more about this diagnostic strategy in this guide on How to Find and Diagnose a Vacuum Leak.
DIY and Professional Detection Methods
Once you have confirmed a leak exists, you need to pinpoint its exact location. There are several DIY and professional methods to do this:
- The Soapy Water Test: Spraying a mixture of water and dish soap around suspected intake gaskets and hoses. If there is a leak, the soapy water will temporarily seal the gap, and you will hear a change in engine RPM or see bubbles if the system is pressurized.
- The Propane Enrichment Test: Using an unlit propane torch, carefully sweep the wand around vacuum lines and gaskets while the engine idles. If the engine draws in the propane, it will burn it as fuel, causing the idle to smooth out and the fuel trims to drop instantly. Note: Use extreme caution, as propane is highly flammable.
- The Smoke Test: This is the gold standard of leak detection. By injecting dense, low-pressure smoke into the intake tract, you can physically watch where the smoke escapes.
For home mechanics looking to save a buck, we have put together The DIY Guide: Detecting Engine Vacuum Leaks Using Household Items.
Using a Smoke Machine for a Vacuum Leak Emissions Test
While DIY tricks can work for large, obvious tears, professional shops rely on specialized diagnostic smoke machines to find hairline cracks that are invisible to the naked eye.
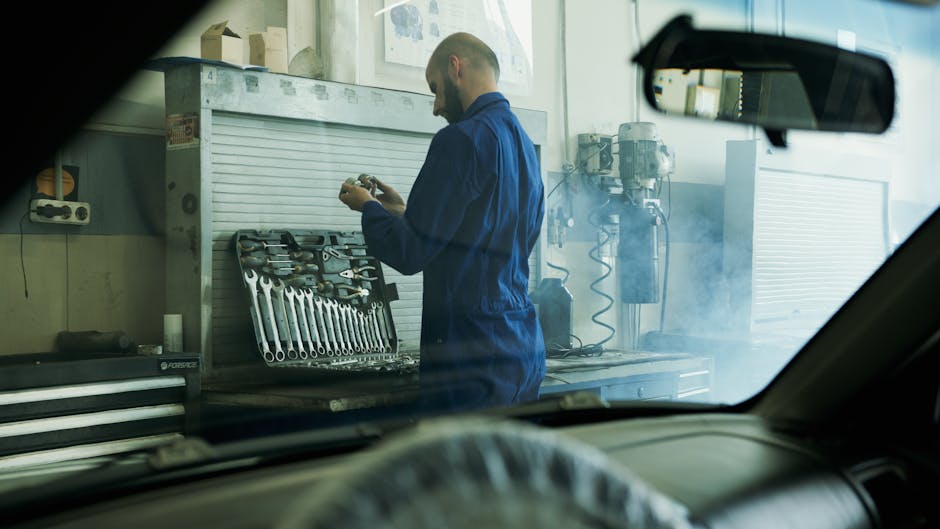
During a professional smoke test:
- We seal off the engine’s air intake (usually at the MAF sensor) using an inflatable bladder or cone.
- We introduce a dense, non-toxic smoke into the intake manifold at a very low pressure — typically between 0.5 and 1.0 PSI. Keeping the pressure low is critical; over-pressurizing the intake can blow out delicate internal seals or damage the fragile diaphragms inside components like the PCV valve or brake booster.
- We use a specialized UV light and yellow glasses to spot the escaping smoke. High-quality smoke machines use a tracer dye (such as UltraTraceUV) that leaves a fluorescent deposit at the exact exit point of the leak, making even microscopic cracks highly visible.
Repair Options, Costs, and Driving Risks
The cost of fixing a vacuum leak depends entirely on which component has failed. A cracked vacuum line might cost $5 in parts and take ten minutes to swap, while a leaking lower intake manifold gasket on a V6 engine can require several hours of labor.
Here is a breakdown of common vacuum leak repairs and what you can expect to pay:
| Leak Source | Typical Repair Difficulty | Estimated Cost Range (Parts & Labor) |
|---|---|---|
| Vacuum Hose / Line | Easy (DIY Friendly) | $100 – $200 |
| PCV Valve & Hose | Easy to Moderate | $120 – $250 |
| Intake Manifold Gasket | Difficult (Professional Recommended) | $400 – $900 |
| Brake Booster Diaphragm | Moderate to Difficult | $350 – $750 |
| EVAP Purge Solenoid | Easy to Moderate | $150 – $300 |
Can You Safely Drive with a Vacuum Leak?
Technically, yes, you can usually drive a short distance with a minor vacuum leak, but doing so carries significant risks.
Because a vacuum leak causes the engine to run lean, it increases combustion temperatures. Over time, these elevated temperatures can lead to engine overheating, burned valves, and even melted pistons.
Furthermore, the unmetered air often causes cylinder misfires. When a cylinder misfires, unburned raw fuel is dumped directly into your exhaust system. This raw fuel travels down to your catalytic converter, where it ignites on the white-hot catalyst elements, quickly melting the converter’s internal honeycomb structure. Replacing a melted catalytic converter can easily cost upwards of $1,500 to $2,500.
If your check engine light has recently popped up due to a suspected leak, find out what your next steps should be by reading What To Do When Your Check Engine Light Comes On.
Frequently Asked Questions About Vacuum Leaks and Emissions
Can I pass an emissions test with a small vacuum leak?
No. Even a very small vacuum leak will prevent you from passing. In Arizona, if your vehicle has an active vacuum leak, it will trigger a lean code (like P0171 or P0174) which commands the Check Engine Light on — resulting in an automatic failure. Even if you clear the code right before the test, the vehicle’s OBD-II readiness monitors will be reset, and the station will reject your car for being “Not Ready.” You can learn more about preparing your vehicle on the official Test Preparation guidelines.
How long does it take for the computer to reset after fixing a vacuum leak?
Once the physical leak is repaired, you must clear the codes and drive the vehicle to reset the OBD-II monitors. This typically requires a “drive cycle” consisting of 50 to 100 miles of mixed driving (both stop-and-go city driving and steady highway cruising). This allows the PCM to run its self-tests and confirm that fuel trims have stabilized. For more on how to navigate this process, see our article on How to Diagnose Check Engine Light.
Will a vacuum leak cause a flashing check engine light?
Usually, a vacuum leak triggers a steady check engine light. However, if the leak is exceptionally large, it can cause a severe “lean misfire.” When the PCM detects a misfire severe enough to cause immediate damage to your catalytic converter, it will flash the check engine light. If your light starts flashing, you should pull over safely and turn off the engine immediately. Learn more about this critical warning by reading What Does It Mean When Your Check Engine Light Starts Flashing.
Conclusion
A vacuum leak emissions test failure doesn’t have to ruin your week. While the symptoms can feel alarming, diagnosing and repairing the root cause is usually a straightforward process when you have the right tools and expertise on your side.
If you are dealing with a rough idle, a glowing check engine light, or an upcoming Arizona emissions test, let the team at Heath’s Auto Service take the stress out of the process. Our ASE-certified technicians have the advanced diagnostic smoke machines and scan tools needed to pinpoint and repair vacuum leaks quickly and accurately.
Heath’s Auto Service In Gilbert, AZ
We stand behind our work with a 3-year/36,000-mile nationwide warranty and offer free second opinions if you’ve been told you need a major repair elsewhere. Don’t spend another day melting in traffic.
At Heath’s Auto Service, our comprehensive range of services covers everything from routine maintenance to complex repairs. Our certified technicians are skilled in handling brake inspections, tire rotations, and much more. Whether it’s a minor tune-up or a major overhaul, trust us to get you back on the road with confidence. Contact our team at Heath’s Auto Service today!